Mineral Cube Project

Mineral Cubes hanging in my classroom:

20171010_140201

Sample of slides of information for Wavelite by Isabella:


This slideshow requires JavaScript.

Distance Learning Edition May/June 2020

Mineral Cube 2020 – Distance Learning was not going to stop us from completing this annual tradition! Students chose their top 10 Minerals and we completed the 2020 Draft Pick using a random name picker to determine the order of each pick. We used one of our Live Zoom Sessions for me to explain the project, go over tech issues, answer questions, and to complete the draft pick.

Using Google Classroom, I made a copy of the template for each student and was able to review their work each day. Students then spent 3 days researching and designing their slides, then a few days building their cubes. We then shared our cubes using Google Slides – each student added their info to one slide and were able to see each others completed Mineral Cubes.

Sample Google Classroom directions:

For the next 3 science classes – you will work on your Mineral Cube Research and gather supplies for your Mineral Cube. I will grade 2 slides each day and give you a classwork grade. When we have LIVE classes, you will sign in and I will look at your slides in real time and answer questions and make suggestions. 

  • Lesson 17: Slides 3 & 4 – the TOP and BOTTOM of the Cube
  • Lesson 18: Slides 5 & 6 – Chemical and Physical Properties of Mineral
  • Lesson 19: Slides 7 & 8 – About and Uses of Mineral
  • Lesson 20:
    • 1. Finalize your slides – make corrections and read my comments, and complete your slide designs.
    • 2. Print and cut out the 6 sides of the cube.
    • 3. Assemble your mineral cube.
    • 4. Add pictures and videos of your mineral cube by Monday to the slides posted for 5/11.

2020 Update Google Slides Template Link – Mineral Research

Completed Slides Template  – Students had the option to upload a video of them holding their Mineral Cube and showing all the sides in addition the images of each side.

Sample Slides of Student Work:

(Public) Mineral Cube - Let's share our cubes _) (1)(Public) Mineral Cube - Let's share our cubes _)

++++++++++++++++++++++++++++++++++++

This activity has become a yearly tradition and I leave the mineral cubes hanging in my classroom from May of one year to the following May, then return it them in 7th grade.

Materials:

Sample of a completed cube with information cut out and cube assembled and decorated:


This slideshow requires JavaScript.


D & T Activity Updated for 2016

New for 2016 – to see the older version with additional lesson details, please visit my post from last year.

This slideshow requires JavaScript.

Before starting the activity, I set the stage that they are a group of archeologists and have discovered an ancient tablet at an archeological dig site. Unfortunately, the tablet is broken and as they excavate, they only find a few pieces at a time. What does the ancient table say? Scientists all over the world try to decipher the ancient text…

Materials:

  • Original Worksheet: (pdf)
  • Worksheet to compare posters (Google Doc)
  • Words to cut apart (pdf) – this year I removed the word “bone” to change it up a little
  • construction paper
  • white paper cut into 1/4ths or small index cards
  • glue sticks
  • colored pencils

This year, I wanted to try something different for this lesson. Instead of seeing how close each group came to the original phrase that was on the “tablet”, I wanted each group to analyze the findings from the other groups to compare their findings and look for similarities and differences. This would be similar to a gallery walk (see video below) but without students explaining their posters, they would view posters at their own pace and choose any 3 posters to compare for each category.


Note – this lesson plan is a modification of the original lesson plan from The University of California Museum of Paleontology (link)

Updated: Dunkin’ for Density using Google Sheets

Updated 2018 – Spreadsheet that will graph 20 trials, along with the Density of Water

Purpose: Change the density of the film canister so that 97-99% of the canister is suspending under water (very SLOWLY floating from the bottom to the top of the tank).

chart (1).png
Dunkin’ for Density 2018

Materials:

  • Film canisters with secure lids – one per student
  • small objects of different masses – pebbles, pennies, etc…
  • lunch tray to hold materials for each group of students
  • deep enough ‘tank’ and a spoon to fish items out
  • Triple Beam Balance
  • Towels
  • Google Sheets: Dunkin’ for Density Spreadsheet 2018
  • Google Doc Public Link – Student worksheet and directions

Set up hints – students prep items at their table then come up to the tank. After dunking, dry off with towels (I just drop it onto a thick folded up towel next to the tank). I have a bank of TBBs set up on the side of the classroom – students find the mass on their assigned TBBs then record results. Repeat trials. Towards the end of class, students enter all their data into the spreadsheet then I give them the volume of their film canister. Depending on the type of film canister, the volumes are about 39-41 mL. Confirm with a large graduated cylinder or water displacement tank.

dunkin_1


For more details about this activity, please see my original post. If you have used this lesson with your students, please let me know, you can post it on my Twitter feed @MSScienceBlog

Heights Lab – How tall is the average 7th grader?

Heights Lab (Public).jpg

This introductory lab is a fun way to analyze data and the students look forward to finding the results each year. Who will be taller, boys or girls? Will we be taller than last year’s class? You can really analyze the data in multiple ways, you can also add the concept of min, max, mode, and range in addition the mean, you can look for trends, and you can talk about sample size, etc…

Materials

  • Heights Lab Introduction and directions (Google Slides)
  • Data Collection (Google Sheets)
  • Heights Lab Template (Google Doc)
  • Construction paper taped to wall/column
  • Metric Tape Measures attached to wall or column over paper
  • Marker
  • Ruler

chart


Scientific and Engineering Practices (SEP 1 to SEP8) Consolidated

This slideshow requires JavaScript.

Images above are from: http://www.nap.edu/read/13165/chapter/7#50 

This post highlights the eight Scientific and Engineering Practices and spotlights a few lessons related to each practice. I had this as eight separate posts but decided to consolidate for easier viewing.

For more details and examples about the Science and Engineering Practices, visit NSTA.

Tag: SEP8 – click for more lessons that cover this practice

Tag: SEP7 – click for more lessons that cover this practice

Tag: SEP6 – click for more lessons that cover this practice

Tag: SEP5 – click for more lessons that cover this practice

Tag: SEP4 – click for more lessons that cover this practice

Tag: SEP3 – click for more lessons that cover this practice

Tag: SEP2 – click for more lessons that cover this practice

Tag: SEP1 – click for more lessons that cover this practice

Atomic Model Timeline


Screen Shot 2016-08-13 at 5.40.32 PM.png
Image Source: Science with Mr. Enns

Materials:

This is a great explanation as well – he has tons of Chemistry videos which are geared more towards High School and College Students.

Rocks, Fossils, and the Law of Superposition Sequencing Activity

Objectives:

  • Sequence information using items which overlap specific sets
  • Relate sequencing to the Law of Superposition
  • Show how fossils can be used to give relative dates to rock layers.

Materials:

  • Fossils, Rocks, and the Law of Superposition Google Slides – this will walk you through the lesson step-by-step
  • Set of 8 cards for each groupsdownload from the UEN
    • additional lesson plan details on their site
    • print and cut apart the 8 cards for each part of the lesson
    • to set up the cards, use large 4×6 index cards and store in ziptop bags.
    • on one side of the index cards, glue on the nonsense letters
    • on the reverse side, glue on the fossil layers
      • laminate for durability
      • Replace the letters for each fossil layer, see my ppt for new random letters
        • spelling out the word “ORGANISM is way too easy for students to figure out and they will not really have a chance to work on the activity with the depth of thinking and problem solving that you want them to do
        • be sure to stagger cards so that the order of the cards is not the same, otherwise they will flip over the cards and have the answer for part 2
  • Notes HandoutLaw of Superposition Notes (pdf) students will take notes and record their answers on this handout.

Tips for this lesson:

This is a fantastic lesson and I have used it successfully with both 5th and 6th grade students. When introducing this lesson I use the analogy of a laundry hamper, or in most cases, the pile of dirty clothes on the floor in their bedroom. Today’s clothes would go on top of the pile, each day adding a layer of dirty clothes. The older clothes would be on the bottom of the pile, kind of like a timeline of what they wore this week. When that laundry is collected and moved to the laundry room, the layers would get disrupted. With rocks, the layers form on top of each other, and the older layers are on the bottom. We then brainstorm how those layers can be disrupted: earthquakes, tectonic plates moving, landslides, digging, etc…

For this activity, they have to figure out the pattern of how these layers are formed, and there are clues in each layer, they just need to know what to look for. For the nonsense letters, there is a pattern that connects all the layers together. Many will think it is alphabetical, but I tell them that it is not. Once they have worked on it a few minutes, I have them share their theories. Once each group has shared their theory, I give them the clue. And suddenly, the pattern is clear now that they know what to look for. Using the same strategy, they will then sequence the fossils on the reverse side of the index cards.


What is Mining? An introduction to Mining


Materials:

  • Google Slides 2018 (Public) – with updated maps April 2018
  • Google Slides 2016 (Public) – this presentation will outline what mining is, where it occurs, types of mines, what commodities are mined in the United States, and covers mining in New Jersey. Maps are from the CDC
  • What is mining?  (pdf) – this is a guided handout that students will take notes on as we discuss mining
  • Sterling Hill Mining Museum – this has been an annual field trip for our school for around 30 years. Their mineral collection is amazing!

Videos: These are also available on Netflix – updated April 2018

Chocolate Chip Cookie Mining Simulation

cookiemining
Cookie Mining – with an example of cookies used for the activity.

Materials:

This is one of my favorite activities from our minerals and mining unit. It takes about 1 whole class period to explain the activity, collect data, eat the cookie (& crumbs), and clean up. We discuss our results the next class and determine who made the most profit.

When determining the value of the chocolate ore, I have the students place their chocolate pieces close together in one area of the map. When they are done, I go around and circle the area of chocolate and give their chocolate a rating. They count the number of boxes their chocolate covers and enter it into their spreadsheet.

If there are crumbs attached to the chocolate, I call that ‘slag’ and it lowers the value of the chocolate ore. This leads to a great discussion afterwards when we compare the profits and talk about land use. Is it better to get out as much chocolate as you can, even if you get a lot of slag, or is it better to remove just the chocolate even though you will have less in the end? How is this similar to coal mining? Diamond mining?

cookiemining2
Students try different techniques to extract the chocolate.
cookiemining3
Cookie blasting – extracting as much chocolate as you can in 5 minutes.


Sheep Head Dissection – Brains, Tongues, and Eyes

Our 7th grade team is revamping the science curriculum to include more dissections. Our focus in 7th grade is The Cell, Genetics, and the Human Body. Last year, we introduced the sheep heart dissection and it was such a great experience for our students. As far as dissections go, I do not like to use preserved specimens – they are often rubbery, pale yellow to beige in color, and look and feel so different than what the specimen is like in its original form. We ordered frozen sheep hearts from the butcher, thawed them in the fridge, and they were able to dissect a heart and see so much more detail than a preserved specimen.

This year, we wanted the students to dissect a sheep brain and didn’t want to use a preserved specimen. There was one ‘problem’, the head came with it. I didn’t see that as problem, instead my first reaction was – “We can dissect the eyes, too!”

The frozen heads were sawed in half so that each group could have half a skull to work on. (We kept some heads intact so that the students could make observations on those as well. Next year I will ask the butcher to saw them in half before they ship them to us.) My husband sawed them in half perfectly (thanks honey!) and it was amazing to see the internal anatomy – the brain, the sinus cavity, the tongue, the teeth, the muscles of the face, the eye in the eye socket, the lip – everything fitting together perfectly and all of it was perfect healthy tissue.

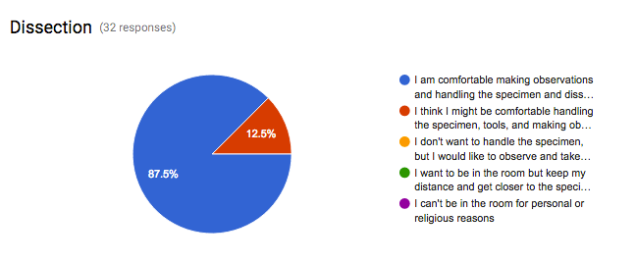
Once we had the heads prepared, and in the freezer, our next concern was student reaction. Would this be too much for them to handle? Would a lot of students opt out? We discussed the sheep head dissection with our students, and answered any and all questions they had. We expressed that they had options with how involved they wanted to be in the dissection process, that there were alternative options available, and we had them complete a quick Google survey. We wanted their honest answers and they were able to change their mind, either way, once the dissections started.

These were the survey choices:

  1. I am comfortable making observations, and handling the specimen and the dissecting tools
  2. I think I might be comfortable handling the specimen, tools, and making observations
  3. I don’t want to handle the specimen, but I would like to observe and take notes for my group
  4. I want to be in the room but keep my distance and get closer to the specimen as I get more comfortable
  5. I can’t be in the room for personal or religious reasons

Below are the student responses:Screen Shot 2016-02-26 at 7.20.04 PM

All of our students were involved in some way based on their comfort level and the dissection was a huge success, something that they will always remember.

This slideshow requires JavaScript.

Some tips for the Sheep Head Dissection:

Storage – large 1 gallon zip top bags can be used to store the 1/2 sheep skull in the fridge or freezer. Whole heads would be stored in a plastic shopping bag – grocery store size. Students names should be written on the bags with a permanent marker prior to any dissections starting. If frozen, half skulls will need to be out a few hours to thaw, whole skulls at least 6 hours. Thawing them the day before then placing them in the fridge works well.

Cleaning up – Lots and lots of newspaper and disinfecting wipes. This made clean up faster and easier. Students were able to wipe down their goggles, then the trays and equipment. Also, triple bag any garbage to avoid leaking and remove from classroom quickly. Since the specimens are food grade, they are able to be thrown out like kitchen refuse.

Dissection equipment – disposable scalpels are the better option, cleaning the scalpels was very time consuming – I did this at the end of the dissection, students did not take scalpels apart for safety reasons. It included removing and disposing the used blades and disinfecting the handles and replacing/screwing on new blades. Also, a few scalpels broke while the students used them. You do not need dissecting trays – aluminum foil trays, esp the ones that come with covers, are a good option. You can keep all your tools in the cover so they are easy to find and won’t get lost or thrown out by accident. When we were done with the dissection, I soaked & washed everything in a bleach solution to disinfect prior to storage.

Reference Material – We printed out diagrams and photos that were laminated and placed on the desks for students to use (we searched Google for images that were clear and easy to see structures with). This was really helpful when identify structures during the dissection. The laminated sheets were used during each class over several days, we did not have to worry about them getting wet or funky while we used them. You can also wipe them down after each class. To guide students during the dissection, we used a simple check list of items we wanted the students to observe. You can laminate this as well and use an Expo marker to check off  items:

Screen Shot 2016-07-08 at 2.49.45 PM

Post – Lab – we discussed the sheep dissection as a class and the students provided great insight and feedback. Instead of a formal lab report, we asked the students to write a one page reflection about their experience.