Volume of a Penny Lab – New!

This slideshow requires JavaScript.

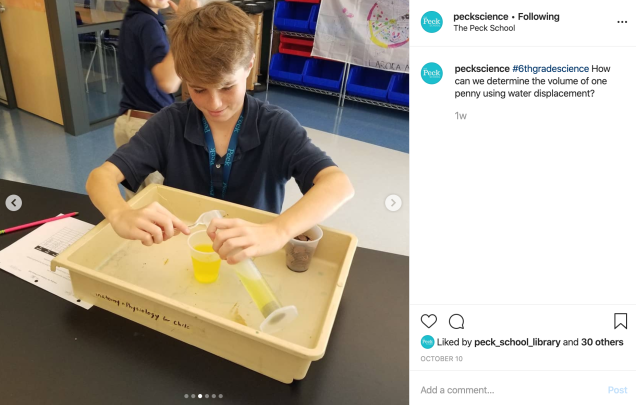
Problem: How can we use water displacement to calculate the volume of one penny?

Materials:

  • Volume of a Penny Lab (PDF)
  • Graduated cylinders (25 mL, 50 mL, or 100 mL)
  • Cup or beaker of water, food coloring optional
  • Pennies – 100+ per group
  • Tub
  • Plastic Spoon – to pour water out of graduated cylinder and separate pennies
Screen Shot 2019-10-18 at 10.33.54 PM

This is a simple & fun lab to have students practice measuring and reading volume as well as use water displacement to determine the volume of  a penny – an irregularly shaped object.

Students will design their own series of 10 tests with the following criteria:

  • All pennies must be under water inside of the graduated cylinder.
  • The volume of water must not pass the 100 mL (or highest) increment.
  • All data is recorded carefully.

Students were able to carefully measure and determine that the volume of a penny was 0.35 mL – most students were very close with a range of 0.33 – 0.37 mL.

https://www.instagram.com/peckscience/

Finding the Mass, Volume, and Density of Water Lab (Google Sheets)

Materials:

Goals

  • Students will practice their measurement skills using a graduated cylinder to determine volume and a triple beam balance to determine mass.
  • Students will determine the density of water by completing 10 trails and finding an average.

I use this lab to tie their measuring skills together and introduce the concept of density. We then do further explorations of density and practice using the formula.

This lab is a modified version of the lab posted at Middle School Chemistry – for further details about the lesson, please click on this link.

Reading a Graduated Cylinder – Rotation Stations


This slideshow requires JavaScript.

Materials:

Lesson Tips

  • Introduce how to read a graduated cylinder using the meniscus.
  • Review how to determine the increments for each graduated cylinder.

Updated: Dunkin’ for Density using Google Sheets

Updated 2018 – Spreadsheet that will graph 20 trials, along with the Density of Water

Purpose: Change the density of the film canister so that 97-99% of the canister is suspending under water (very SLOWLY floating from the bottom to the top of the tank).

chart (1).png
Dunkin’ for Density 2018

Materials:

  • Film canisters with secure lids – one per student
  • small objects of different masses – pebbles, pennies, etc…
  • lunch tray to hold materials for each group of students
  • deep enough ‘tank’ and a spoon to fish items out
  • Triple Beam Balance
  • Towels
  • Google Sheets: Dunkin’ for Density Spreadsheet 2018
  • Google Doc Public Link – Student worksheet and directions

Set up hints – students prep items at their table then come up to the tank. After dunking, dry off with towels (I just drop it onto a thick folded up towel next to the tank). I have a bank of TBBs set up on the side of the classroom – students find the mass on their assigned TBBs then record results. Repeat trials. Towards the end of class, students enter all their data into the spreadsheet then I give them the volume of their film canister. Depending on the type of film canister, the volumes are about 39-41 mL. Confirm with a large graduated cylinder or water displacement tank.

dunkin_1


For more details about this activity, please see my original post. If you have used this lesson with your students, please let me know, you can post it on my Twitter feed @MSScienceBlog

Atomic Model Timeline


Screen Shot 2016-08-13 at 5.40.32 PM.png
Image Source: Science with Mr. Enns

Materials:

This is a great explanation as well – he has tons of Chemistry videos which are geared more towards High School and College Students.

The Atoms Family

Materials:

  • Google Slide Presentation (Public) – a fun way to introduce the parts of the atom and how to determine the numbers of protons, neutrons, and electrons. Get ready to do some singing and snapping 🙂
  • Handoutsvia ScienceSpot.net

Color Coding Families on the Periodic Table

This is a fun way to introduce the families of the periodic table and their properties. The students really enjoy watching the video clips from Periodic Table Videos and the experiments performed by the Chemistry Department at the University of Nottingham.

As a class, we found the location of each family, recorded the elements for each family, discussed their properties, color coded the periodic table, and discussed any patterns they noticed.

Materials

  • Google Slides (Public) – updated for 2016 with links to the YouTube videos to view an element in each family
  • Handout – (pdf) students take notes for each family and use this is a reference for further lessons
  • Periodic Table – (Updated 2016 pdf) I like to use this student version of the periodic table from Jefferson Lab for my 6th graders. I photocopy it double sided – one side stays blank while the other side is color coded. If students have binders with a clear pocket on the outside front, I ask that they place it there for quick reference and access.

This activity was featured on the following blog post: The Joy of Chemistry – A Unit in Photos a few years ago. You can read about how she used this lesson in her 3rd grade classroom as part of her Chemistry unit.

Below is a video about Sodium from Periodic Table Videos. They have a lot of great chemistry videos posted for free on their site, be sure to check them out!

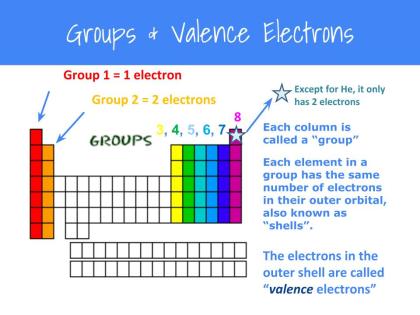
Patterns of the Periodic Table: Finding Shells and Valence Electrons

Materials:

  • Google Slides – students will learn how to find the number of energy levels (shells) for elements in periods 1 – 8 and the number of valence electrons in their outer shells using the periodic table. Updated (Public link)
  • Handout – updated Shells & Valence Electrons
    • Older version: How to determine the number of valence electrons and shells using the element’s group number and period – Notes (pdf) and Slides (ppt)
  • Find that Element!” Worksheet (pdf)- Practice finding the period & group for each element


How to draw Lewis Structures – a step by step tutorial

Materials:

  • Updated Google Slides (Public Link) with step-by-step instructions on how to draw Lewis Structures
  • Lewis Diagrams worksheets

How to draw Bohr Diagrams – a step by step tutorial

I updated the Google Slides and worksheet for my lesson on drawing Bohr Diagrams. This lesson will walk your students through the basics on how to draw a Bohr Diagram for the first 20 elements on the periodic table. I also created a simple worksheet for students to record their drawings and do independent practice.

You can access them at:

For additional lessons related to atoms and the periodic table, please click on the tags below.