Meiosis & DNA Cheat Sheets – Free

Updated 11.25.18 – click links for most updated versions:

********

I made these cheat sheets for my 7s to help them with our Meiosis and DNA unit. These are two of the most complex topics we cover in Life Science and it helps them synthesize all of the information into one page.

Screen Shot 2017-12-08 at 12.12.21 PM

Download these free PDFs below:

DNA Cheat Sheet – 2017 – Google Docs – this covers the fundamentals of DNA at a 7th grade level

Meiosis Summary Cheat Sheet – 2017 – this covers the basics of Meiosis along with a comparison to Mitosis at each stage for a 7th grade level


“Substituted Sammy” – what makes something alive?

substituted-sammy-characteristics-of-life-public

Lesson Plan: Substituted Sammy Google Slides (Public) modified from: “Substituted Sammy”: An Exercise in Defining Life, Donald F. Shebesta, The American Biology Teacher, Vol. 34 No. 5, May, 1972; (pp. 286-287) DOI: 10.2307/4443933

I love using this activity as an introduction to get my 7th grade students thinking about the idea of living vs. nonliving. How do we define life? How do we know something isn’t alive anymore? How are living things different than nonliving things? How are nonliving things different than things that were once living? What characteristics do living things have in common?

To start the lesson, we brainstorm and try to pin point what it means to be alive. Accept all answers and write them on the board.  After our brainstorming and discussion session, I draw Sammy on the board in one colored dry erase marker ( ie blue) and ask students to do the same. I explain that we are going to learn about Sammy and every time something about Sammy changes, I will draw it in a different color (ie red) and ask students to do the same in pencil.

As the story progresses, I also draw a dialysis machine, IV bag and stand, ventilator, etc… and essentially, end up drawing a robot at the end. This leads to some great discussions about what we can do now, and what we can’t do yet, in the medical field. It also brings up the discussion about the quality of Sammy’s life, at some point is he really living his life or just alive? I ask the students to give Sammy a percentage of “living” as we go through the slides, is he 50% living, 80% living, 25% living, etc and they give a wide range of answers. I then reveal it is a trick question, the answer has to be either 0% or 100%, you can’t be partially living, biologically speaking – you are either alive or not alive, there really is no quantitative scale. Quality of life is not a biological definition, instead it is an ethical issue and everyone has their own definition or belief system. (And then there is the gray area that Viruses fall into ;))

Sheep Head Dissection – Brains, Tongues, and Eyes

Our 7th grade team is revamping the science curriculum to include more dissections. Our focus in 7th grade is The Cell, Genetics, and the Human Body. Last year, we introduced the sheep heart dissection and it was such a great experience for our students. As far as dissections go, I do not like to use preserved specimens – they are often rubbery, pale yellow to beige in color, and look and feel so different than what the specimen is like in its original form. We ordered frozen sheep hearts from the butcher, thawed them in the fridge, and they were able to dissect a heart and see so much more detail than a preserved specimen.

This year, we wanted the students to dissect a sheep brain and didn’t want to use a preserved specimen. There was one ‘problem’, the head came with it. I didn’t see that as problem, instead my first reaction was – “We can dissect the eyes, too!”

The frozen heads were sawed in half so that each group could have half a skull to work on. (We kept some heads intact so that the students could make observations on those as well. Next year I will ask the butcher to saw them in half before they ship them to us.) My husband sawed them in half perfectly (thanks honey!) and it was amazing to see the internal anatomy – the brain, the sinus cavity, the tongue, the teeth, the muscles of the face, the eye in the eye socket, the lip – everything fitting together perfectly and all of it was perfect healthy tissue.

Once we had the heads prepared, and in the freezer, our next concern was student reaction. Would this be too much for them to handle? Would a lot of students opt out? We discussed the sheep head dissection with our students, and answered any and all questions they had. We expressed that they had options with how involved they wanted to be in the dissection process, that there were alternative options available, and we had them complete a quick Google survey. We wanted their honest answers and they were able to change their mind, either way, once the dissections started.

These were the survey choices:

  1. I am comfortable making observations, and handling the specimen and the dissecting tools
  2. I think I might be comfortable handling the specimen, tools, and making observations
  3. I don’t want to handle the specimen, but I would like to observe and take notes for my group
  4. I want to be in the room but keep my distance and get closer to the specimen as I get more comfortable
  5. I can’t be in the room for personal or religious reasons

Below are the student responses:Screen Shot 2016-02-26 at 7.20.04 PM
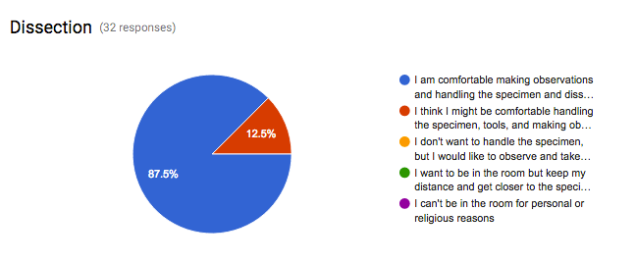
All of our students were involved in some way based on their comfort level and the dissection was a huge success, something that they will always remember.

This slideshow requires JavaScript.

Some tips for the Sheep Head Dissection:

Storage – large 1 gallon zip top bags can be used to store the 1/2 sheep skull in the fridge or freezer. Whole heads would be stored in a plastic shopping bag – grocery store size. Students names should be written on the bags with a permanent marker prior to any dissections starting. If frozen, half skulls will need to be out a few hours to thaw, whole skulls at least 6 hours. Thawing them the day before then placing them in the fridge works well.

Cleaning up – Lots and lots of newspaper and disinfecting wipes. This made clean up faster and easier. Students were able to wipe down their goggles, then the trays and equipment. Also, triple bag any garbage to avoid leaking and remove from classroom quickly. Since the specimens are food grade, they are able to be thrown out like kitchen refuse.

Dissection equipment – disposable scalpels are the better option, cleaning the scalpels was very time consuming – I did this at the end of the dissection, students did not take scalpels apart for safety reasons. It included removing and disposing the used blades and disinfecting the handles and replacing/screwing on new blades. Also, a few scalpels broke while the students used them. You do not need dissecting trays – aluminum foil trays, esp the ones that come with covers, are a good option. You can keep all your tools in the cover so they are easy to find and won’t get lost or thrown out by accident. When we were done with the dissection, I soaked & washed everything in a bleach solution to disinfect prior to storage.

Reference Material – We printed out diagrams and photos that were laminated and placed on the desks for students to use (we searched Google for images that were clear and easy to see structures with). This was really helpful when identify structures during the dissection. The laminated sheets were used during each class over several days, we did not have to worry about them getting wet or funky while we used them. You can also wipe them down after each class. To guide students during the dissection, we used a simple check list of items we wanted the students to observe. You can laminate this as well and use an Expo marker to check off  items:

Screen Shot 2016-07-08 at 2.49.45 PM

Post – Lab – we discussed the sheep dissection as a class and the students provided great insight and feedback. Instead of a formal lab report, we asked the students to write a one page reflection about their experience.


Sheep Heart Dissection

Sheep Heart Dissection

As part of the 7th graders current unit on the heart and circulatory system, we had a current parent come in (Dr. C – a Cardiac Electrophysiologist) to give a presentation to the whole 7th grade about the heart, pacemakers, heart health, and perform a dissection on the sheep heart. We set up a camera and projected it onto a large screen so that all the students could see to the dissection from anywhere in the room. Dr. C gave a wonderful presentation and we were lucky to have him share his experience and knowledge with us!

The next day, students had an opportunity to dissect a sheep heart and examine the structure and function of the heart up close. The students used sheep hearts that were frozen and then thawed prior to use instead of using preserved specimens. In my opinion, this provides a more realistic experience and is easier for the students to dissect. Since the heart was fresh, the cardiac muscle, arteries, valves, and veins were much easier to see and handle this way.

Sheep Heart Dissection

Materials:

  • goggles
  • gloves
  • lab coat/apron/old shirt
  • disinfecting wipes
  • scalpel
  • pins
  • scissors
  • pre-made labels using sticky notes or masking tape
  • probes
  • dissecting tray

Resources:

  • Which way to the heart? Students learned about Heart Anatomy and Blood Flow (blog entry)
  • Pickle Dissection – Students learned how to use dissection tools (blog entry)
  • Teach Engineering: Sheep Heart Dissection (link)
  • Carolina: Sheep Heart (link)
  • BioEd Online (link)
  • Biology Corner (link)
  • PBS Learning Media (link)

Which way to the heart? Free Sequencing Activity using Task Cards

Source: Wikipedia Commons

This is an updated version of an activity I have used with my 7th graders in the past. To get a true understanding of how blood circulates through their body, and to review the parts of the heart, I have the students sort the cards and place them in the right order starting and ending with the right atrium.

Students work in pairs placing the cards into the correct sequence on their desks. When they are ready to have their work checked, I start at the right atrium and go until I find a card out of place, then I stop and have them figure out what should come next and I’ll come back to check later. It will take several tries until they complete it correctly. When they are done, students can quiz each other using the cards or they can try the activity individually and have their partner check their work. Students can also use the Google Slides to review at home or print out a color set for their own use.

Resources

  • Heart Coloring Page – this is a great diagram of the heart. We color this together step-by-step in class when introducing the parts of the heart. Students can use pink and blue highlighters or colored pencils. (link)
    • We use blue only to distinguish deoxygenated blood from oxygenated blood in diagrams
    • I have the students hold the diagram in front of them and face each other so that they can see the right side of the heart matches their right side, but when the diagram is on their desk, the right side of the heart is on their left.
    • When we are done coloring, using their pointer finger, students trace the path of blood through the heart as I say each part in the correct sequence
  • Google Slides – (Public Link)
  • Cards to cut apart (pdf)
    • Need one set of cards per 2-4 students
    • Can laminate and reuse each year, store in a zip-top bag
  • BrainPOP – Circulatory System Video (link)
  • Circulation Song – catchy song (link)
  • School House Rock – circulation song from my younger days (link)
  • Study Jams – Circulation Video (link)
    • This video has a simplified explanation, but is incorrect in stating that deoxygenation blood cells look blue, which adds to the common misconception students have about their blood being blue when it is in their veins.
    • You can ask them if they ever had their blood drawn, it doesn’t come out blue, it comes out maroon-ish or dark-red instead of bright red like when they get get a paper cut or scrape their knee.
  • Horseshoe Crabs have blue blood: Nature Video link updated 3/8/18
  • New link, Ted Ed: