Our 7th grade team is revamping the science curriculum to include more dissections. Our focus in 7th grade is The Cell, Genetics, and the Human Body. Last year, we introduced the sheep heart dissection and it was such a great experience for our students. As far as dissections go, I do not like to use preserved specimens – they are often rubbery, pale yellow to beige in color, and look and feel so different than what the specimen is like in its original form. We ordered frozen sheep hearts from the butcher, thawed them in the fridge, and they were able to dissect a heart and see so much more detail than a preserved specimen.
This year, we wanted the students to dissect a sheep brain and didn’t want to use a preserved specimen. There was one ‘problem’, the head came with it. I didn’t see that as problem, instead my first reaction was – “We can dissect the eyes, too!”


The frozen heads were sawed in half so that each group could have half a skull to work on. (We kept some heads intact so that the students could make observations on those as well. Next year I will ask the butcher to saw them in half before they ship them to us.) My husband sawed them in half perfectly (thanks honey!) and it was amazing to see the internal anatomy – the brain, the sinus cavity, the tongue, the teeth, the muscles of the face, the eye in the eye socket, the lip – everything fitting together perfectly and all of it was perfect healthy tissue.
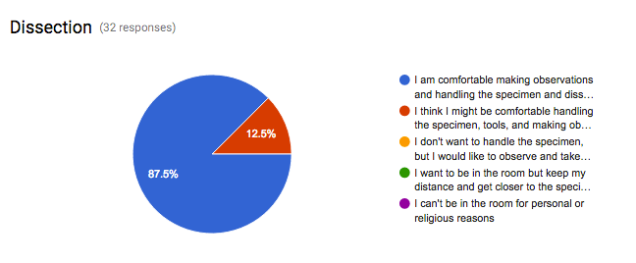
Once we had the heads prepared, and in the freezer, our next concern was student reaction. Would this be too much for them to handle? Would a lot of students opt out? We discussed the sheep head dissection with our students, and answered any and all questions they had. We expressed that they had options with how involved they wanted to be in the dissection process, that there were alternative options available, and we had them complete a quick Google survey. We wanted their honest answers and they were able to change their mind, either way, once the dissections started.
These were the survey choices:
- I am comfortable making observations, and handling the specimen and the dissecting tools
- I think I might be comfortable handling the specimen, tools, and making observations
- I don’t want to handle the specimen, but I would like to observe and take notes for my group
- I want to be in the room but keep my distance and get closer to the specimen as I get more comfortable
- I can’t be in the room for personal or religious reasons
Below are the student responses:
All of our students were involved in some way based on their comfort level and the dissection was a huge success, something that they will always remember.
Some tips for the Sheep Head Dissection:
Storage – large 1 gallon zip top bags can be used to store the 1/2 sheep skull in the fridge or freezer. Whole heads would be stored in a plastic shopping bag – grocery store size. Students names should be written on the bags with a permanent marker prior to any dissections starting. If frozen, half skulls will need to be out a few hours to thaw, whole skulls at least 6 hours. Thawing them the day before then placing them in the fridge works well.
Cleaning up – Lots and lots of newspaper and disinfecting wipes. This made clean up faster and easier. Students were able to wipe down their goggles, then the trays and equipment. Also, triple bag any garbage to avoid leaking and remove from classroom quickly. Since the specimens are food grade, they are able to be thrown out like kitchen refuse.
Dissection equipment – disposable scalpels are the better option, cleaning the scalpels was very time consuming – I did this at the end of the dissection, students did not take scalpels apart for safety reasons. It included removing and disposing the used blades and disinfecting the handles and replacing/screwing on new blades. Also, a few scalpels broke while the students used them. You do not need dissecting trays – aluminum foil trays, esp the ones that come with covers, are a good option. You can keep all your tools in the cover so they are easy to find and won’t get lost or thrown out by accident. When we were done with the dissection, I soaked & washed everything in a bleach solution to disinfect prior to storage.
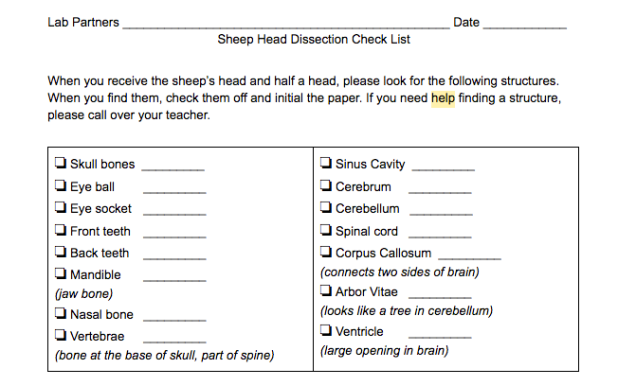
Reference Material – We printed out diagrams and photos that were laminated and placed on the desks for students to use (we searched Google for images that were clear and easy to see structures with). This was really helpful when identify structures during the dissection. The laminated sheets were used during each class over several days, we did not have to worry about them getting wet or funky while we used them. You can also wipe them down after each class. To guide students during the dissection, we used a simple check list of items we wanted the students to observe. You can laminate this as well and use an Expo marker to check off items:

Post – Lab – we discussed the sheep dissection as a class and the students provided great insight and feedback. Instead of a formal lab report, we asked the students to write a one page reflection about their experience.