Volume of a Penny Lab – New!

This slideshow requires JavaScript.

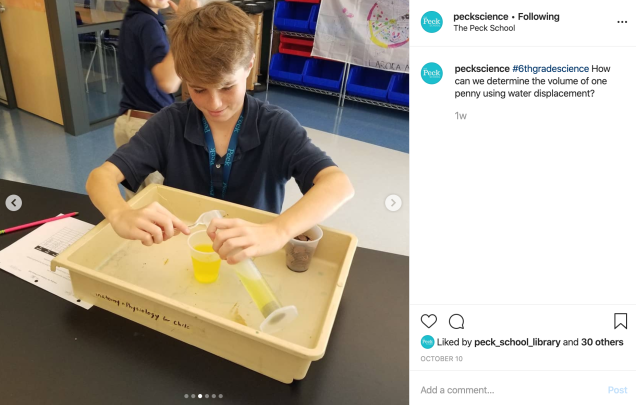
Problem: How can we use water displacement to calculate the volume of one penny?

Materials:

  • Volume of a Penny Lab (PDF)
  • Graduated cylinders (25 mL, 50 mL, or 100 mL)
  • Cup or beaker of water, food coloring optional
  • Pennies – 100+ per group
  • Tub
  • Plastic Spoon – to pour water out of graduated cylinder and separate pennies

Screen Shot 2019-10-18 at 10.33.54 PM

This is a simple & fun lab to have students practice measuring and reading volume as well as use water displacement to determine the volume of  a penny – an irregularly shaped object.

Students will design their own series of 10 tests with the following criteria:

  • All pennies must be under water inside of the graduated cylinder.
  • The volume of water must not pass the 100 mL (or highest) increment.
  • All data is recorded carefully.

Students were able to carefully measure and determine that the volume of a penny was 0.35 mL – most students were very close with a range of 0.33 – 0.37 mL.

https://www.instagram.com/peckscience/

Finding the Mass, Volume, and Density of Water Lab (Google Sheets)

Materials:

Goals

  • Students will practice their measurement skills using a graduated cylinder to determine volume and a triple beam balance to determine mass.
  • Students will determine the density of water by completing 10 trails and finding an average.

I use this lab to tie their measuring skills together and introduce the concept of density. We then do further explorations of density and practice using the formula.

This lab is a modified version of the lab posted at Middle School Chemistry – for further details about the lesson, please click on this link.

Mineral Cube Project

Mineral Cubes hanging in my classroom:

20171010_140201

Sample of slides of information for Wavelite by Isabella:


This slideshow requires JavaScript.

Distance Learning Edition May/June 2020

Mineral Cube 2020 – Distance Learning was not going to stop us from completing this annual tradition! Students chose their top 10 Minerals and we completed the 2020 Draft Pick using a random name picker to determine the order of each pick. We used one of our Live Zoom Sessions for me to explain the project, go over tech issues, answer questions, and to complete the draft pick.

Using Google Classroom, I made a copy of the template for each student and was able to review their work each day. Students then spent 3 days researching and designing their slides, then a few days building their cubes. We then shared our cubes using Google Slides – each student added their info to one slide and were able to see each others completed Mineral Cubes.

Sample Google Classroom directions:

For the next 3 science classes – you will work on your Mineral Cube Research and gather supplies for your Mineral Cube. I will grade 2 slides each day and give you a classwork grade. When we have LIVE classes, you will sign in and I will look at your slides in real time and answer questions and make suggestions. 

  • Lesson 17: Slides 3 & 4 – the TOP and BOTTOM of the Cube
  • Lesson 18: Slides 5 & 6 – Chemical and Physical Properties of Mineral
  • Lesson 19: Slides 7 & 8 – About and Uses of Mineral
  • Lesson 20:
    • 1. Finalize your slides – make corrections and read my comments, and complete your slide designs.
    • 2. Print and cut out the 6 sides of the cube.
    • 3. Assemble your mineral cube.
    • 4. Add pictures and videos of your mineral cube by Monday to the slides posted for 5/11.

2020 Update Google Slides Template Link – Mineral Research

Completed Slides Template  – Students had the option to upload a video of them holding their Mineral Cube and showing all the sides in addition the images of each side.

Sample Slides of Student Work:

(Public) Mineral Cube - Let's share our cubes _) (1)(Public) Mineral Cube - Let's share our cubes _)

++++++++++++++++++++++++++++++++++++

This activity has become a yearly tradition and I leave the mineral cubes hanging in my classroom from May of one year to the following May, then return it them in 7th grade.

Materials:

Sample of a completed cube with information cut out and cube assembled and decorated:


This slideshow requires JavaScript.
 

Balancing Equations: A Hands on Activity

balancing-equations-answers-public

Balancing Chemical Equations Activity – one of my long time favorite activities. Students will learn how to read formulas, count atoms, create and read chemical equations, and balance chemical equations using a hands on activity with color coded formulas cards.

401414_336885659683300_820115613_n

Lesson Resources: Create one set of materials for each pair of students. Store in a large zip-top bag

  • Worksheet: handout with directions (pdf)
  • Formula cards (pdf) – laminate and reuse each year
  • Coefficient cards (pdf) – laminate and reuse each year
  • Answer Key for the balanced equations (pdf)
  • Google Slides (NEW) – Balancing Equations Answer Key Public Link
    • These slides can be used to review answers at the end of the lesson
    • You can also print the slides then laminate to use as Task Cards at a hands on station with beads to represent each atom
    • For more advanced students, you can use molecular models and build each model.
  • Practice balancing equations worksheet (pdf) and more from ScienceSpot.net

balancing-equations-answers-public-1

https://www.instagram.com/p/BvfHwICgiUfro_4i4_XtVN2oHfiJIbvP_DX8QM0/

Atomic Model Timeline


Screen Shot 2016-08-13 at 5.40.32 PM.png
Image Source: Science with Mr. Enns

Materials:

This is a great explanation as well – he has tons of Chemistry videos which are geared more towards High School and College Students.

The Atoms Family

Materials:

  • Google Slide Presentation (Public) – a fun way to introduce the parts of the atom and how to determine the numbers of protons, neutrons, and electrons. Get ready to do some singing and snapping 🙂
  • Handoutsvia ScienceSpot.net

Color Coding Families on the Periodic Table

This is a fun way to introduce the families of the periodic table and their properties. The students really enjoy watching the video clips from Periodic Table Videos and the experiments performed by the Chemistry Department at the University of Nottingham.

As a class, we found the location of each family, recorded the elements for each family, discussed their properties, color coded the periodic table, and discussed any patterns they noticed.

Materials

  • Google Slides (Public) – updated for 2016 with links to the YouTube videos to view an element in each family
  • Handout – (pdf) students take notes for each family and use this is a reference for further lessons
  • Periodic Table – (Updated 2016 pdf) I like to use this student version of the periodic table from Jefferson Lab for my 6th graders. I photocopy it double sided – one side stays blank while the other side is color coded. If students have binders with a clear pocket on the outside front, I ask that they place it there for quick reference and access.

This activity was featured on the following blog post: The Joy of Chemistry – A Unit in Photos a few years ago. You can read about how she used this lesson in her 3rd grade classroom as part of her Chemistry unit.

Below is a video about Sodium from Periodic Table Videos. They have a lot of great chemistry videos posted for free on their site, be sure to check them out!

Patterns of the Periodic Table: Finding Shells and Valence Electrons

Materials:

  • Google Slides – students will learn how to find the number of energy levels (shells) for elements in periods 1 – 8 and the number of valence electrons in their outer shells using the periodic table. Updated (Public link)
  • Handout – updated Shells & Valence Electrons
    • Older version: How to determine the number of valence electrons and shells using the element’s group number and period – Notes (pdf) and Slides (ppt)
  • Find that Element!” Worksheet (pdf)- Practice finding the period & group for each element


How to draw Lewis Structures – a step by step tutorial

Materials:

  • Updated Google Slides (Public Link) with step-by-step instructions on how to draw Lewis Structures
  • Lewis Diagrams worksheets

How to draw Bohr Diagrams – a step by step tutorial

I updated the Google Slides and worksheet for my lesson on drawing Bohr Diagrams. This lesson will walk your students through the basics on how to draw a Bohr Diagram for the first 20 elements on the periodic table. I also created a simple worksheet for students to record their drawings and do independent practice.

You can access them at:

For additional lessons related to atoms and the periodic table, please click on the tags below.