Volume of a Penny Lab – New!

This slideshow requires JavaScript.

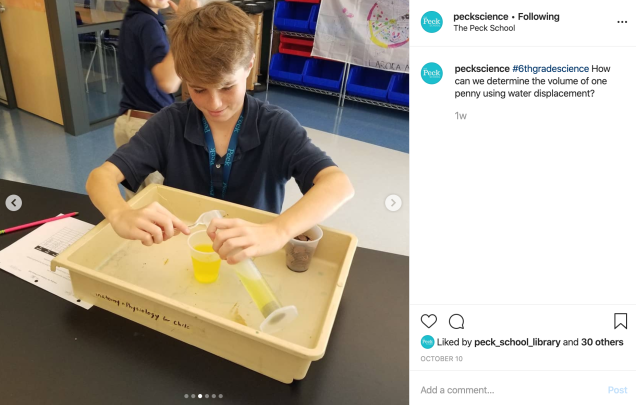
Problem: How can we use water displacement to calculate the volume of one penny?

Materials:

  • Volume of a Penny Lab (PDF)
  • Graduated cylinders (25 mL, 50 mL, or 100 mL)
  • Cup or beaker of water, food coloring optional
  • Pennies – 100+ per group
  • Tub
  • Plastic Spoon – to pour water out of graduated cylinder and separate pennies

Screen Shot 2019-10-18 at 10.33.54 PM

This is a simple & fun lab to have students practice measuring and reading volume as well as use water displacement to determine the volume of  a penny – an irregularly shaped object.

Students will design their own series of 10 tests with the following criteria:

  • All pennies must be under water inside of the graduated cylinder.
  • The volume of water must not pass the 100 mL (or highest) increment.
  • All data is recorded carefully.

Students were able to carefully measure and determine that the volume of a penny was 0.35 mL – most students were very close with a range of 0.33 – 0.37 mL.

https://www.instagram.com/peckscience/

Mineral Cube Project

Mineral Cubes hanging in my classroom:

20171010_140201

Sample of slides of information for Wavelite by Isabella:


This slideshow requires JavaScript.

Distance Learning Edition May/June 2020

Mineral Cube 2020 – Distance Learning was not going to stop us from completing this annual tradition! Students chose their top 10 Minerals and we completed the 2020 Draft Pick using a random name picker to determine the order of each pick. We used one of our Live Zoom Sessions for me to explain the project, go over tech issues, answer questions, and to complete the draft pick.

Using Google Classroom, I made a copy of the template for each student and was able to review their work each day. Students then spent 3 days researching and designing their slides, then a few days building their cubes. We then shared our cubes using Google Slides – each student added their info to one slide and were able to see each others completed Mineral Cubes.

Sample Google Classroom directions:

For the next 3 science classes – you will work on your Mineral Cube Research and gather supplies for your Mineral Cube. I will grade 2 slides each day and give you a classwork grade. When we have LIVE classes, you will sign in and I will look at your slides in real time and answer questions and make suggestions. 

  • Lesson 17: Slides 3 & 4 – the TOP and BOTTOM of the Cube
  • Lesson 18: Slides 5 & 6 – Chemical and Physical Properties of Mineral
  • Lesson 19: Slides 7 & 8 – About and Uses of Mineral
  • Lesson 20:
    • 1. Finalize your slides – make corrections and read my comments, and complete your slide designs.
    • 2. Print and cut out the 6 sides of the cube.
    • 3. Assemble your mineral cube.
    • 4. Add pictures and videos of your mineral cube by Monday to the slides posted for 5/11.

2020 Update Google Slides Template Link – Mineral Research

Completed Slides Template  – Students had the option to upload a video of them holding their Mineral Cube and showing all the sides in addition the images of each side.

Sample Slides of Student Work:

(Public) Mineral Cube - Let's share our cubes _) (1)(Public) Mineral Cube - Let's share our cubes _)

++++++++++++++++++++++++++++++++++++

This activity has become a yearly tradition and I leave the mineral cubes hanging in my classroom from May of one year to the following May, then return it them in 7th grade.

Materials:

Sample of a completed cube with information cut out and cube assembled and decorated:


This slideshow requires JavaScript.
 

What is Mining? An introduction to Mining


Materials:

  • Google Slides 2018 (Public) – with updated maps April 2018
  • Google Slides 2016 (Public) – this presentation will outline what mining is, where it occurs, types of mines, what commodities are mined in the United States, and covers mining in New Jersey. Maps are from the CDC
  • What is mining?  (pdf) – this is a guided handout that students will take notes on as we discuss mining
  • Sterling Hill Mining Museum – this has been an annual field trip for our school for around 30 years. Their mineral collection is amazing!

Videos: These are also available on Netflix – updated April 2018

Element Advertisement Project Using Google Draw

Element Advertisting Template

  • This lesson is modified from the original lesson posted at ScienceSpot.net
    • Detailed lesson information, along with a rubric, can be found on her website
  • Top 10 Elements Draft Pick ElementDraftPick
    • Student will research the ‘stats’ for their favorite elements
    • Students will draw numbers to determine the order in which they will pick their element
    • Once an element has been chosen, no one else in the class can choose that element and they will cross it off their list
  • Google Draw Template: Google Draw Public Link
    • Students will spend one class period researching their element and creating an advertisement using Google Draw.
    • If not done during class time, it will be completed for homework over a few days.
    • Display the element advertisements so students can see their work 🙂
    • To use the template, simply make a copy of the template to make changes, please do not request editing rights
  • Links for research

Density – Identification Challenge

image

Updated 11/11/18

I modified this lab to use metal cubes and rectangular prisms and had the students identify the metals and some of the blocks from Flinn.

  • Updated Google Sheets – this will do all the calculations for you once you enter the measurements
  • Updated Google Doc – this is the handout I used with this lesson

Materials:

  • Flinn Scientfic Block set (link) & Resources/Handout (pdf)
  • Metal blocks set – iron, aluminum, brass, steel, zinc, & copper
  • Ruler
  • Calculator
  • Triple Beam Balance
  • Worksheet to collect data (pdf)

For this activity, I used the set of density blocks from Flinn Scientific. Each group of students had 6 blocks made of the same material. Their challenge was to identify the material using their measurement skills to calculate the mass, volume, and density of each block. This activity also reinforced the concept that the density of an object is constant.

Minerals in your house

Mineralogy 4 Kids - Minerals in your house
Mineralogy 4 Kids – Minerals in your house

Materials:

  • Website: Mineralogy4Kids (link) – a great website that provides students with a wealth of information on minerals.
  • Handout: Minerals in your house (pdf)

I like to use the Minerals in Your House page to introduce minerals to my students and have them explore the different ways we use minerals in our everyday life. In this post I am including an updated worksheet for students to take notes while they view the website.

‘Alien Juice Bar’ – Cabbage Juice and pH Values

Screen Shot 2015-03-05 at 11.29.30 AM

This classic interactive website is a great way to practice identifying acidic, basic, and neutral substances along with reading pH values. There are three different levels which increase in difficulty as the students complete each activity.

Challenge 1 – students have to identify and categorize the different ‘juices’ that they will serve to the aliens as either Acids, Bases, or Neutral.

Challenge 2 – students will practice serving requested juices to aliens, but if they serve a juice from the wrong category, aliens can become sick, or worse!

Challenge 3 – students have to change the pH values of the juices on the tray by either adding acids or bases to raise or lower the pH values.

Physical & Chemical Properties vs Physical & Chemical Changes Foldable

pdf
8 1/2 x 14 Foldable

Materials

  • Physical & Chemical Properties vs Physical & Chemical Changes Foldable Notes – (link)
  • Reinforcement page (pdf)
  • Glue
  • Scissors

How to use the foldable:

  1. This activity can be done with or without a partner
  2. Cut the tabs on the dotted guide lines, but do not fold yet, instead keep the paper flat
  3. Page 3 of the document contains the notes, Page 4 is the answer key
  4. The notes are not grouped together correctly – cut out each piece of information along the dotted lines
  5. Place the notes into the correct boxes under the corresponding tabs
  6. Do not glue anything yet, just a dry fit at this point
  7. Discuss the answers
  8. Glue the correct pieces in order, move the incorrect pieces
  9. When done,  fold the tabs so they meet in the middle
  10. Glue into notebook