Sheep Head Dissection – Brains, Tongues, and Eyes

Our 7th grade team is revamping the science curriculum to include more dissections. Our focus in 7th grade is The Cell, Genetics, and the Human Body. Last year, we introduced the sheep heart dissection and it was such a great experience for our students. As far as dissections go, I do not like to use preserved specimens – they are often rubbery, pale yellow to beige in color, and look and feel so different than what the specimen is like in its original form. We ordered frozen sheep hearts from the butcher, thawed them in the fridge, and they were able to dissect a heart and see so much more detail than a preserved specimen.

This year, we wanted the students to dissect a sheep brain and didn’t want to use a preserved specimen. There was one ‘problem’, the head came with it. I didn’t see that as problem, instead my first reaction was – “We can dissect the eyes, too!”

The frozen heads were sawed in half so that each group could have half a skull to work on. (We kept some heads intact so that the students could make observations on those as well. Next year I will ask the butcher to saw them in half before they ship them to us.) My husband sawed them in half perfectly (thanks honey!) and it was amazing to see the internal anatomy – the brain, the sinus cavity, the tongue, the teeth, the muscles of the face, the eye in the eye socket, the lip – everything fitting together perfectly and all of it was perfect healthy tissue.

Once we had the heads prepared, and in the freezer, our next concern was student reaction. Would this be too much for them to handle? Would a lot of students opt out? We discussed the sheep head dissection with our students, and answered any and all questions they had. We expressed that they had options with how involved they wanted to be in the dissection process, that there were alternative options available, and we had them complete a quick Google survey. We wanted their honest answers and they were able to change their mind, either way, once the dissections started.

These were the survey choices:

  1. I am comfortable making observations, and handling the specimen and the dissecting tools
  2. I think I might be comfortable handling the specimen, tools, and making observations
  3. I don’t want to handle the specimen, but I would like to observe and take notes for my group
  4. I want to be in the room but keep my distance and get closer to the specimen as I get more comfortable
  5. I can’t be in the room for personal or religious reasons

Below are the student responses:Screen Shot 2016-02-26 at 7.20.04 PM
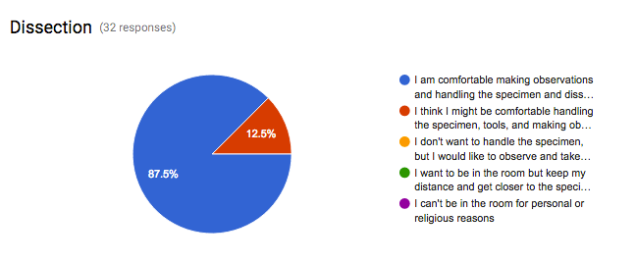
All of our students were involved in some way based on their comfort level and the dissection was a huge success, something that they will always remember.

This slideshow requires JavaScript.

Some tips for the Sheep Head Dissection:

Storage – large 1 gallon zip top bags can be used to store the 1/2 sheep skull in the fridge or freezer. Whole heads would be stored in a plastic shopping bag – grocery store size. Students names should be written on the bags with a permanent marker prior to any dissections starting. If frozen, half skulls will need to be out a few hours to thaw, whole skulls at least 6 hours. Thawing them the day before then placing them in the fridge works well.

Cleaning up – Lots and lots of newspaper and disinfecting wipes. This made clean up faster and easier. Students were able to wipe down their goggles, then the trays and equipment. Also, triple bag any garbage to avoid leaking and remove from classroom quickly. Since the specimens are food grade, they are able to be thrown out like kitchen refuse.

Dissection equipment – disposable scalpels are the better option, cleaning the scalpels was very time consuming – I did this at the end of the dissection, students did not take scalpels apart for safety reasons. It included removing and disposing the used blades and disinfecting the handles and replacing/screwing on new blades. Also, a few scalpels broke while the students used them. You do not need dissecting trays – aluminum foil trays, esp the ones that come with covers, are a good option. You can keep all your tools in the cover so they are easy to find and won’t get lost or thrown out by accident. When we were done with the dissection, I soaked & washed everything in a bleach solution to disinfect prior to storage.

Reference Material – We printed out diagrams and photos that were laminated and placed on the desks for students to use (we searched Google for images that were clear and easy to see structures with). This was really helpful when identify structures during the dissection. The laminated sheets were used during each class over several days, we did not have to worry about them getting wet or funky while we used them. You can also wipe them down after each class. To guide students during the dissection, we used a simple check list of items we wanted the students to observe. You can laminate this as well and use an Expo marker to check off  items:

Screen Shot 2016-07-08 at 2.49.45 PM

Post – Lab – we discussed the sheep dissection as a class and the students provided great insight and feedback. Instead of a formal lab report, we asked the students to write a one page reflection about their experience.


Sheep Heart Dissection

Sheep Heart Dissection

As part of the 7th graders current unit on the heart and circulatory system, we had a current parent come in (Dr. C – a Cardiac Electrophysiologist) to give a presentation to the whole 7th grade about the heart, pacemakers, heart health, and perform a dissection on the sheep heart. We set up a camera and projected it onto a large screen so that all the students could see to the dissection from anywhere in the room. Dr. C gave a wonderful presentation and we were lucky to have him share his experience and knowledge with us!

The next day, students had an opportunity to dissect a sheep heart and examine the structure and function of the heart up close. The students used sheep hearts that were frozen and then thawed prior to use instead of using preserved specimens. In my opinion, this provides a more realistic experience and is easier for the students to dissect. Since the heart was fresh, the cardiac muscle, arteries, valves, and veins were much easier to see and handle this way.

Sheep Heart Dissection

Materials:

  • goggles
  • gloves
  • lab coat/apron/old shirt
  • disinfecting wipes
  • scalpel
  • pins
  • scissors
  • pre-made labels using sticky notes or masking tape
  • probes
  • dissecting tray

Resources:

  • Which way to the heart? Students learned about Heart Anatomy and Blood Flow (blog entry)
  • Pickle Dissection – Students learned how to use dissection tools (blog entry)
  • Teach Engineering: Sheep Heart Dissection (link)
  • Carolina: Sheep Heart (link)
  • BioEd Online (link)
  • Biology Corner (link)
  • PBS Learning Media (link)

Cow Eye Dissection

Screen Shot 2015-03-22 at 2.02.49 PM

The cow eye dissection is a great lesson to use as part of your unit on the nervous system and the five senses. There are several different ways you can use this lesson in the classroom.

Video & Model Only – share and discuss the video above. Using diagrams and clay/playdoh, students can create a model of the eye or use a scientific model to identify the structure and function of each part of the eye. Some students may be very uncomfortable watching the video and they can either turn around and listen or may have to leave the room.

Video, Model, and Demonstration – In addition to above, students can observe a cow eye demonstration. I like to use fresh specimens whenever possible, visiting your local butcher or farm is an option to look into instead of the preserved specimens, and generally are less expensive. Dispose of specimens properly.

Video, Model, Demonstration, and Dissection – In addition to above, students can work in small groups to perform a cow eye dissection. I like to use groups of 3 or 4 per dissection, this saves on specimens and it allows students to work at their own comfort level. Some students will only want to observe, some students want to do a little bit of the dissection, some will dive right in, and others will not take part at all and will have to do either the video/model only or the video/model and then observe your demonstration from a distance. Dispose of specimens properly.

Exploratorium Links

  • Video Home Page (link)
  • Interactive Eye Diagram (link) and printable version (link)
  • Step-by-step Instructions (pdf)

Additional Resources

  • BrainPOP Video – Eyes (link)
  • Study Jams – The Senses – Seeing (link)
  • Teen Health – Eyes (link)
  • Kid’s Health in the Classroom Teacher’s Guide – Vision (pdf)
  • See all you can see – The National Eye Institute (link)
    • Anatomy of the Eye – handout (pdf)
  • The Cow Eye – iBook (link) for iPads or Mac

Liberty Science Center: Traveling Science Workshop – Have LSC (or a local science museum) come to your school to conduct the lesson with your students.

Cow’s Eye Dissection | Grades: 6 – 10
Follow light on its journey through the eye. Led by a Liberty Science Center educator, students will pair off to perform cow eye dissections and in the process gain a deeper understanding of the structure of the human eye.
NJCCCS: 5.1 C, 5.1.D, 5.3.A
NGSS: LS1A: Structure and Function

Download Cow’s Eye Dissection pre-visit activity packet (link/pdf)

Pickle Dissection

This is a classic activity for students to do before they dissect actual specimens such as the earthworm, perch, squid, and frog. Most students have never used a scalpel before and when cutting something, cut all the way through the item when using a knife. When using a scalpel, they have to learn to NOT cut through something and to make precise incisions at the proper depth. Using a pickle as a specimen is a quick, easy, and inexpensive option. The pickle has already been preserved, much like the specimens they will be using in class, but smells much better 😉 Students will also practice using the proper terminology for dissections (such as anterior, posterior, dorsal, ventral, etc.), sketching their specimens during the dissection, and taking measurements.

Materials:

  • Jar of pickles, any store brand that is about finger length
  • scalpel
  • dissecting tray
  • pins
  • tweezers
  • dissecting probe

Here are three versions of this activity to choose from:

  1. Simpler (pdf)
  2. More detailed (pdf)
  3. Pickle Autopsy (link)

Oh, and by the way, never place dissecting trays in the dishwasher. I grew up without a dishwasher and never used one before. We had one in the science office and I thought, this is great, I can clean the dissecting trays and sterilize them in the brand new dishwasher the science department just installed a month ago. Loaded the dishwasher and went home. Came in the next day and opened it up to find that all of the black tar/wax coated EVERY single square inch of the inside of the dishwasher, and it was not coming off…ever. The other science teachers and I tried everything we could think of to remove it. I had to tell my department chair and principal what happened. Yeah, that was fun. We had to get another new dishwasher installed. Let’s just say I never lived it down, it was a monumental rookie mistake.