DNA, RNA, & Crime, Oh My! (Modified Snorks Activity)

This is a fun and creative activity to tie all of the following concepts together into one lesson: DNA sequencing & transcription, mRNA translation, amino acid codons & proteins, genotype, phenotype, recessive & dominant alleles & traits.


This slideshow requires JavaScript.

Students will help solve a crime based on DNA evidence left on a lollipop at the crime scene. There are 3 versions of the same scenario that will identify 3 different criminals so you can use them for 3 classes – this avoids having the kids tell the next class who the suspect is ;). Each student will receive one of the 4 DNA samples – you can have students work individually, or have a group of students work on suspect 1, another on suspect 2, etc. (Sorry – I do not have an answer key to post)

Directions: Worksheets: DNA-RNA-Crime-Snorks-2018 & Amino Acid Codon Wheel, & additional resource: 20 Amino Acids

  • Step 1 – students will transcribe the DNA sequences into mRNA sequences
  • Step 2 – using the Amino Acid codon wheel, they will determine the amino acid for each codon
  • Step 3 – using the chart, they will find protein using the sequence of amino acids
  • Step 4 – using the proteins, they will determine the phenotype
  • Step 5 – using the phenotypes, they will determine the genotype(s)
  • Step 6 – is their suspect the criminal?
  • Step 7 – they will draw a mug shot of their suspect using the phenotypes they decoded

This lesson was modified from the one found on Biology Corner: https://www.biologycorner.com/worksheets/DNA_snorks.html 


DNA – Paper Protein Chains Activity

DNA-paper-protein-chains
Making protein chains – In this example, the color code is different than posted in the lesson, it was a prototype

Purpose:

  • Students will convert their name into a DNA sequence and create a protein chain.

Materials:

  • Student Handout (DNAPaperProteinChainsActivity)
  • Amino Acid Handout (link)
  • pre-cut 2 inch wide strips of construction paper  (12×18) in the following colors – red*, pink, yellow, orange*, green, lt. blue, dk.blue, and black*
    • (*) be sure to have more of these colors since they are vowels
    • I used a paper cutter and was able to make a lot of strips very quickly ahead of time
  • markers
  • staplers
  • clothes pins and string to hang up in classroom


25398918_863734253808_1620785906939523613_n
Protein Chains made by M.P.’s class Dec. 2017

Procedures:

  1. This activity should be used after DNA and protein synthesis has been introduced. This activity will help reinforce the concept of how the sequence of DNA codons create specific amino acids, and in turn, the amino acids are joined together to create specific proteins. (link)
  2. Each student will write the letters from their first and last name onto the student handout.
  3. Using the chart, they will find the amino acid associated with the first letter of their first name.
  4. For example, if the first letter is “L”, it will code for Leucine. They will select one of the codons for Leucine and write it on their chart.
  5. Write the color of the paper link they will need for “L”, in this case, it is Red.
  6. Repeat for every letter in their name.
  7. Once their handout is completed, they will select the colored links, one for each letter of their name.
  8. The colored links will be placed in the same order as the letters in their name.
  9. On each link, write one of the codons for that letter. For example, “L” would be “CTT” on a Red link.
  10. Loop and staple the first letter of their name.
  11. Weave through the second letter and staple the loop closed.
  12. Continue until all the letters have been linked together.
  13. Hang up the protein chain, be sure to have the first letter of their name at the top.
  14. Look for patterns – what color was used the most? Which group of amino acids was it? Which group of amino acids was used the least? Who had the longest name? Etc.

Protein Synthesis (link)

Plastic Egg Genetics

Easter-Eggs

It is that time of year again: time to ask everyone you know to save their plastic Easter eggs and that you will be more than happy to take them off their hands – once the kids have emptied out the goodies, of course! 

Below are some links to teachers who have used this lesson in the past:

  • University of Southern California (link)
  • Western Kentucky University (link)
  • Science Matters (link)
  • Homeschool Life Journal (link)
  • And a big thank you to Brent from Georgia who did a great job explaining how to set up and use this activity with your students, see his detailed video below.

Resources:

  • Original Lesson Plan (link)
  • Student Worksheet I created for the lesson plan (pdf)
    • NOTE: the colors in this activity represent Incomplete Dominance and their outcomes
    • Here is a nice review of the three different types of dominance from Khan Academy (video link)
    • For Dominant and Recessive Traits only, this lesson would have to be modified and use 1 whole egg for each parent, and the answers would NOT be inside the eggs:
      • Blue & Yellow only (BB, Bb = blue, bb = yellow)
        • Blue egg – 2 blue pieces
        • Blue egg – 1 blue piece, 1 yellow piece
        • Yellow egg – 2 yellow pieces
          • Open eggs for genotypes, then make punnett squares
      • Purple & Pink only  (PP, Pp = Purple, pp = pink)
  • BrainPOP Video: Heredity (free link)
  • BrainPOP Video: DNA (free link)

If you have used this lesson in the past, would love to hear how it went! If you wrote about it on your blog, I would love to add your link to the site as well!

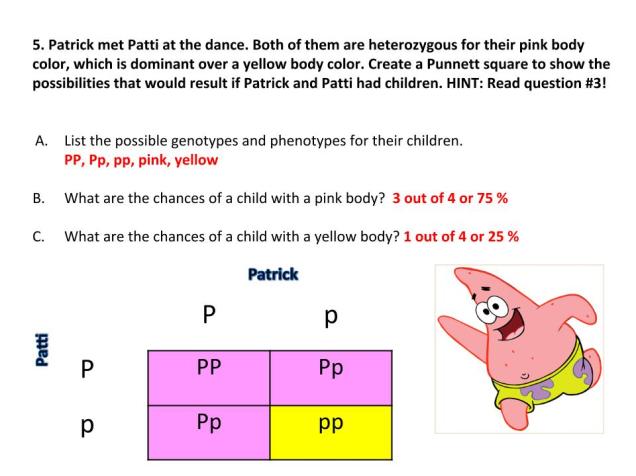
Genetics with SpongeBob – Learning how to use Punnett Squares

Practice Punnett Squares with SpongeBob & the Gang

If you have a unit on genetics, this is a must have as part of your lesson plans. The worksheets were created by Tracy and posted on her website, ScienceSpot.net (link). I created a Google Slides presentation for my 7th graders to help them set up, solve, and analyze Punnett squares.

As a class, we worked on the first few problems together. Then, students worked with a partner and self checked their work using the ppt slides. For homework, they were to finish the problems and self check using the ppt slides. In class the next day, we reviewed some of the problems to check for understanding.

Materials:

  1. Google Slides: SpongeBob Genetics -(public link)
  2. Worksheet: Bikini Bottom Genetics – part 1 (pdf)
  3. Worksheet: Bikini Bottoms Genetics – part 2 (pdf)
  4. Additional Links: More fun with Genetics at ScienceSpot.net (link)

SpongBob Genetics - Public

Blood Types Flashcards & Games

I used this hands-on activity as a review/reinforcement with my 7th graders and it really helped them understand the different blood types, about blood donation, and basic Punnett Squares. Plus they had fun playing the games and making up their own games.

Materials:

  • One set of laminated flashcards (pdf) per person, or two sets shared in a group of 4 students
  • pencil and lined paper to make Punnett Squares

All of the instructions and different games to play are explained in the handout. Some examples are: Who can donate? Punnett Square Practice, Identification, Memory, and Matching.

Other ways to use the cards:

  • Flashcards –  Students can print their own at home and use them to study
  • You can set up a station/rotation to play the games as they are, or as ‘make your own’ game stations. Or a combination of both. Place one game at each station and have the students rotate every 7-10 minutes (see below for logistics)
  • Rotation Directions – students will rotate from table to table and learn to play the game at each station
    • Need a group of 4 students at each station.
    • When it is time to rotate, only 2 go to the next station, and 2 stay.
    • The 2 that stay are the experts on that game.
    • The 2 experts teach the 2 novices how to play when they rotate to the table.
    • When it is time to rotate, the 2 experts who stayed go to the next group, and the novices are now the experts and teach the 2 new novices that came to the station.
  • Quiz-Quiz Trade
    • give each student a RBC card and have them identify it, then trade
    • give each student a blood-type card and ask for the genotype (ie AA or AO)
    • Or mix both decks and play both games
  • Find your Partner
    • give half or your class Blood Type Cards and the other half of the class RBC cards and have them find the matching set

Interactive Links for further practice

  • Blood Typing Game – can you make the right choice? (link)
  • Are you my blood type? can you find the donor? (link)
  • Emergency Room – figure out the blood type and correct transfusion (link)
  • NatGeo – interactive heart (link)
  • BrainPOP:  Blood & Blood Pressure

If you use this lesson in your classroom, I am always happy to hear how it went!

For related lesson plans, please visit my Life Science page.